Earlier the Screensavers were used to prevent burn out on CRT monitors, but nowadays it’s more of a security feature. For example, if you are away from your computer for a few hours, the chances are that someone might access your files, passwords etc. if the PC is not locked or turned off by you. But if you have correctly set the lock screen timeout setting, then the display will automatically turn off after the PC is left idle for few minutes and if someone tries to access it, Windows will as for login password. The only problem with this security feature is that sometimes the lock screen timeout is set to 5 minutes, meaning that the computer will lock screen after the PC is left idle for 5 minutes. Now, this setting annoys a lot of users as their PC can get lock frequently and they have to enter the password every time which waste their lot of time. To prevent this from happening, you need to increase the lock screen timeout setting in Windows 10 to frequently prevent turning off the display.
Change Lock Screen Timeout Setting in Windows 10
Make sure to create a restore point just in case something goes wrong.
Change Lock Screen Timeout Setting in Windows 10 Method 1: Increase Screen Timeout Setting from Windows Settings Method 2: Change Lock Screen Timeout Setting from Control Panel Method 3: Using Registry Method 4: Change Lock screen timeout Settings using Command Prompt
Method 1: Increase Screen Timeout Setting from Windows Settings
1.Press Windows Keys + I to open Settings then click on Personalization.
From the left-hand menu, choose Lock Screen.
Now scroll down till you find Screen timeout settings and once you find it click on it.
Set the time setting under Screen to a little higher if you want to avoid turning off the screen every now & than.
If you want completely disable the setting then choose Never from the dropdown.
Make sure that the sleep time is set higher than the screen turn off time or else the PC will go to sleep, and the screen wouldn’t be locked.
It’s preferred if Sleep is disabled or at least set at 30 minutes or more, in this case, you will have a lot of time to get back to your PC; if not, it will go into sleep mode.
Reboot your PC to save changes.
Method 2: Change Lock Screen Timeout Setting from Control Panel
Note: This is just an alternative of the above method if you have followed that then skip this step.
Press Windows Key + X then select Control Panel.
Click System and Security then click on Power Options.
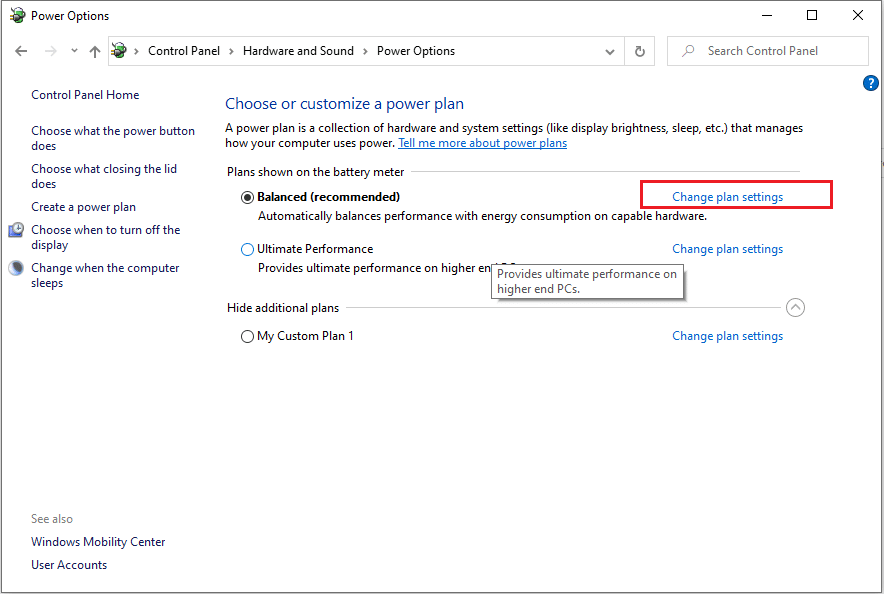
Now click Change plan settings next to your currently active power plan.
Again set the same settings as advice in the previous method.
Make sure to set the settings for both batteries and plugged in option.
Method 3: Using Registry
Press Windows Key + R then type regedit and hit Enter to open Registry Editor.
Navigate to the following path in the Registry: HKEYLOCAL_MACHINE\SYSTEM\CurrentControlSet\Control\Power\PowerSettings\7516b95f-f776-4464-8c53-06167f40cc99\8EC4B3A5-6868-48c2-BE75-4F3044BE88A7
On the right-hand side window, double click on Attributes DWORD.
If you can’t find it, you need to create the DWORD, right-click in an empty area in the right-hand side window and select New > DWORD (32-bit) value.
Name it as Attributes and double click on it.
Now change its value from 1 to 2 and click OK.
Reboot your PC to save changes.
Now right-click on Power icon on the system tray and select Power Options.
Click Change plan settings next to your currently active plan.
Then click Change advanced power settings.
Scroll down till your see Display, then click on it to expand its settings.
Double click on Console lock display off a timeout and then change its value from 1 minute to the time you want.
Click Apply, followed by OK.
Reboot your PC to save changes.
Method 4: Change Lock screen timeout Settings using Command Prompt
Press Windows Key + X then select Command Prompt (Admin).
Type the following command and press Enter: powercfg.exe /SETACVALUEINDEX SCHEME_CURRENT SUB_VIDEO VIDEOCONLOCK 60 powercfg.exe /SETDCVALUEINDEX SCHEME_CURRENT SUB_VIDEO VIDEOCONLOCK 60
Note: You must replace the “60” in the above command with the screen timeout setting you want (in seconds) for example if you want 5 minutes then set it at 300 seconds. 3. Again type the following command and hit Enter: powercfg.exe /SETACTIVE SCHEME_CURRENT 4. Reboot your PC to save changes. Recommended:
Fix DPC_WATCHDOG_VIOLATION Error 0x00000133 Fix Windows could not automatically detect this network’s proxy settings Resolve Windows 10 Freezes Randomly Issue Fix There was a problem resetting your PC error
That’s it you have successfully learned How to Change Lock Screen Timeout Setting in Windows 10 but if you still have any questions regarding this post then feel free to ask them in the comment’s section.


![]()


