How to Fix Windows Key Disabled
Though the Windows key is helpful in many ways, pressing the Windows key while playing games would be a nightmare for gamers. So, people disable the Windows key for a better gaming experience. However, the Windows key on your keyboard is helpful in many ways like Windows key opens the Start menu. It also performs other tasks with a combination of other keys.
How to Fix Windows Key Disabled Method 1: Clean the Keyboard Method 2: Through Keyboard Hotkey Method 3: Turn Off Game Mode Method 4: Use Powershell Command Method 5: Turn Off Filter Keys and Sticky Keys Method 6: Disable Turn Off Windows Key Hotkeys Setting Method 7: Modify Registry Settings Method 8: Remap Keys Through PowerToys Method 9: Run SFC and DISM Scans Method 10: Run Malware Scan Method 11: Replace Keyboard
For Example:
Press the Windows + R keys simultaneously to open the Run dialog Box. Press Windows + E keys together to open File Explorer. Press the Windows + X keys simultaneously to open a Quick link menu. Press the Windows + D keys at the same time to show or hide the Desktop.
Hence, these are some Windows key keyboard shortcuts. However, if you face Windows key disabled issue then follow the given methods on how to enable Windows key.
Method 1: Clean the Keyboard
You can face this issue of Windows key being disabled if you haven’t cleaned your keyboard for a long time. Dust in your keyboard might also cause this problem. If you are using an external keyboard, then follow the steps below.
Unplug the external keyboard from the system.
Remove dust and clean the keyboard using a soft bristle brush.
Plug the external keyboard back into the system.
Try using the Windows key now.
Method 2: Through Keyboard Hotkey
If you are using a keyboard where you have a hotkey to enable or disable the Windows key, then try looking for that particular key. Try hitting the key to enable or disable the Windows key. However, many of the keyboards may not have the hotkey. In that case, follow any of the methods below to resolve the Windows key not opening the Start menu issue.
Method 3: Turn Off Game Mode
The game mode is one of many features Windows 10 comes with keeping gamers in mind. While in Game mode, Windows key is disabled to avoid pressing it mistakenly during playing a game. Makes sure you are not in Game mode as it is common to face Windows key disabled issues in Game mode. To turn off the Game mode:
Click on Start, type game mode settings, and hit the Enter key.
Switch Off the toggle for Game Mode.
Note: To disable Windows key, you can turn on Game Mode again by following the above steps. Also Read: Fix keyboard Input lag in Windows 10
Method 4: Use Powershell Command
Powershell incorporates new commands that can be used to fix Windows key disabled issues by following these step:.
Click on Start and type PowerShell and click on Open in the search results.
Type the following command window and press the Enter key. Note: During the execution of the command, you will see many errors. But those do not affect the process and once it completes
Finally, restart your computer.
Method 5: Turn Off Filter Keys and Sticky Keys
Filter keys are generally used for ignoring or slowing down the keystroke but are notorious for messing with Windows keys on many occasions. The same goes with Sticky Keys. To disable Filter Keys and Sticky Keys:
Press the Windows key, type Control Panel and click on Open.
Set View by > Category and click on Ease of Access.
Under the Ease of Access Center heading, click on Change how your keyboard works.
Uncheck the checkbox for Turn off Filter Keys and Turn on Sticky Keys. Click on Apply>OK.
Check if your Windows key is functional now or not. You can always follow the above steps and check the options for Turn on Sticky Keys and Turn on Filter keys to disable Windows key again. Also Read: How to Enable Dell Keyboard Backlight Settings
Method 6: Disable Turn Off Windows Key Hotkeys Setting
You can restrict or allow a feature by changing the Group Policy settings. Follow the steps below carefully. Note: Group Policy Editor is not available in the Home edition but can be found in Pro or Enterprise editions.
Press Windows + R keys simultaneously to open the Run dialog box.
Type gpedit.msc and hit Ctrl + Shift + Enter keys together to run local group policy editor as administrator.
Navigate to the User Configuration > Administrative Templates > Windows Components > File Explorer folder from the left pane.
Scroll down and double-click Turn off Windows Key hotkeys.
Select the Disabled option.
Click Apply and then OK to save changes. If you want to disable Windows key then follow the same steps as above but, select the Enabled option in the step 5.
Method 7: Modify Registry Settings
Another method on how to enable Windows key is to modify registry settings. Follow the instructions below carefully because of any changes made to the registry editor permanently. Also, note that any incorrect changes would cause a serious issue.
Launch the Run dialog box and type regedit and click on OK.
Click Yes in the User Account Control prompt.
Navigate to the following path from the address bar in Registry Editor.
Double-click on the NoWinkeys string.
Set the Value data as 0. Note: Changing the value to 1 will disable Windows key.
Click OK and restart your PC. Also Read: How to Reassign Mouse Buttons on Windows 10
Method 8: Remap Keys Through PowerToys
You can also modify the function or enable the Windows key using Microsoft’s Remap Keyboard PowerToy. Follow the steps below.
Download and install PowerToys.
Now, launch the PowerToys app.
Click on Keyboard Manager on the left pane.
Then, click on the Open Settings option as highlighted in the pic below.
Switch On the toggle for Enable Keyboard Manager.
Now, click on Remap a key.
Here, click on the + icon as highlighted in the pic below.
Select the option Win under the Key category.
Then, select a function under the Mapped To category and click on OK.
Click on the Continue Anyway button in the confirmation prompt.
Method 9: Run SFC and DISM Scans
Another common reason behind the Windows key disabled issue is corrupt system files. Thankfully, Windows come prepared to handle these kinds of scenarios. System File Checker or SFC scan searches for corrupt system files and repair them to ensure smooth working. Follow these steps to run an SFC scan:
Hit the Windows key, type Command Prompt and click on Run as administrator.
Click on Yes in the User Account Control prompt.
Type the command: sfc /scannow and press Enter key to run the System File Checker scan.
Note: A system scan will be initiated and it will take a couple of minutes to finish. Meanwhile, you can continue performing other activities but be mindful of not accidentally closing the window. After completing the scan, it will show either of these messages:
Windows Resource Protection did not find any integrity violations. Windows Resource Protection could not perform the requested operation. Windows Resource Protection found corrupt files and successfully repaired them. Windows Resource Protection found corrupt files but was unable to fix some of them.
- Once the scan is finished, restart your PC.
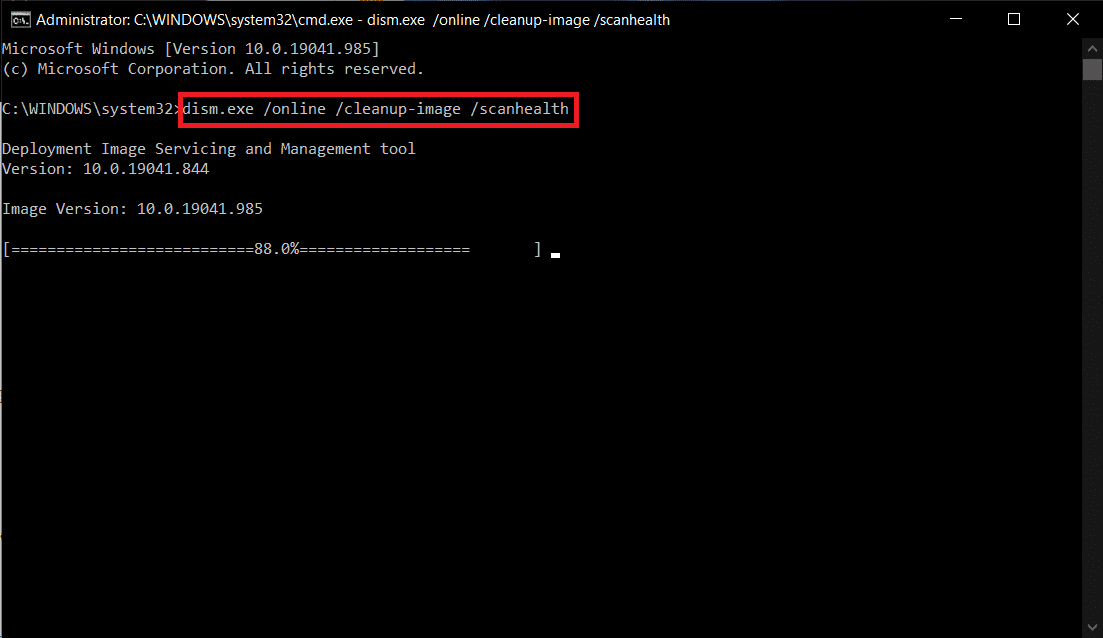
- Again, launch Command Prompt as administrator and execute the given commands one after the other: Note: You must have a working internet connection to execute DISM commands properly.
Also Read: How to Use TV as Monitor for Windows 11 PC
Method 10: Run Malware Scan
The last thing you need in your computer is malware wreaking havoc and messing up everything. And the first symptom of an infected PC can be the Windows key not opening the Start menu. To search for any malware, you need to run a full system scan to detect any malicious file or application present on your computer by following these rules:
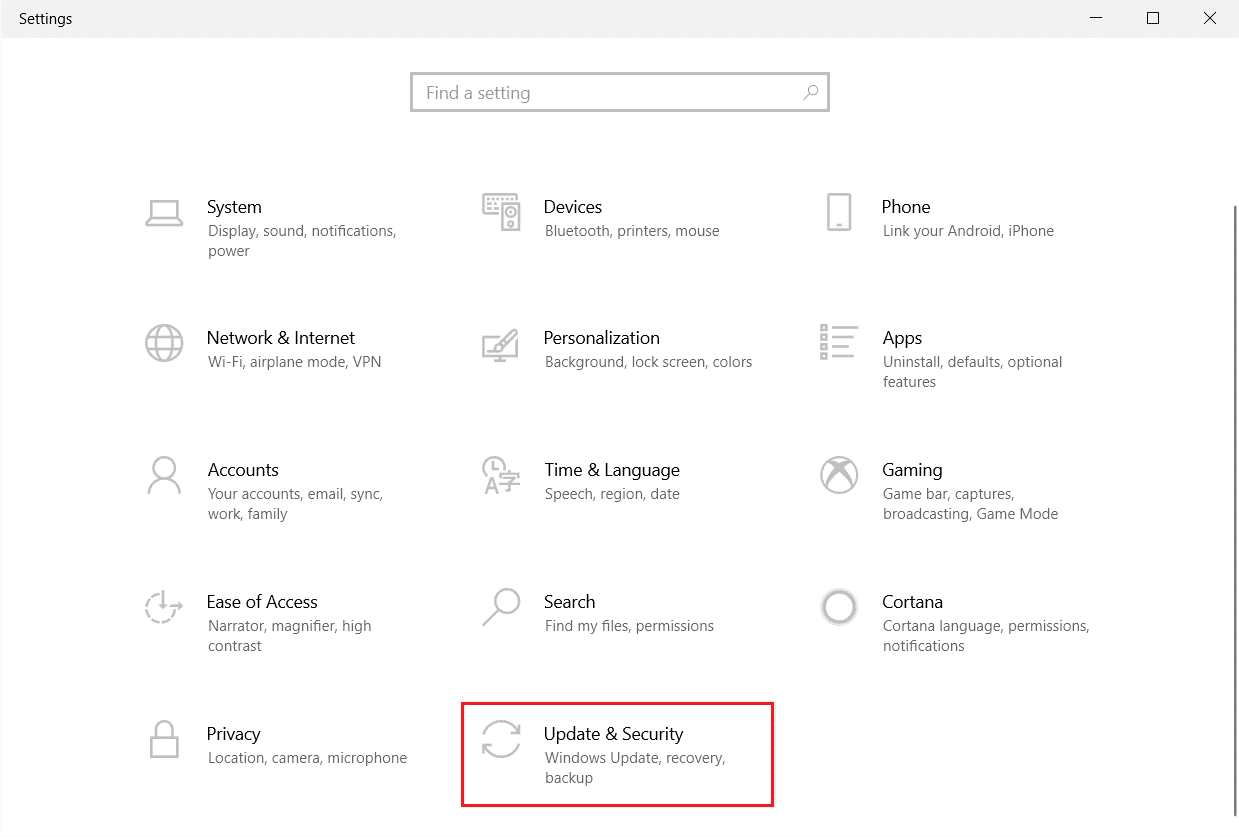
Hit Windows + I keys simultaneously to launch Settings.
Here, click on Update & Security settings as shown.
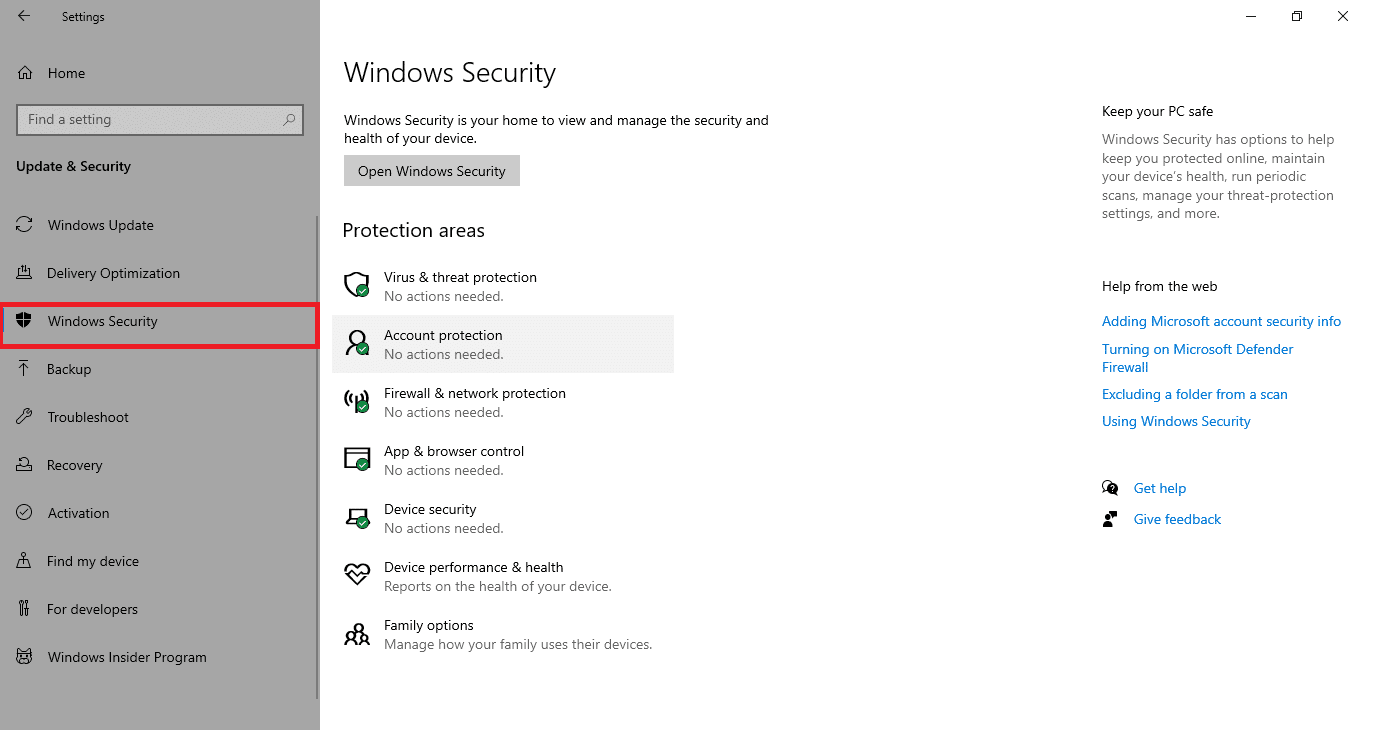
Go to Windows Security in the left pane.
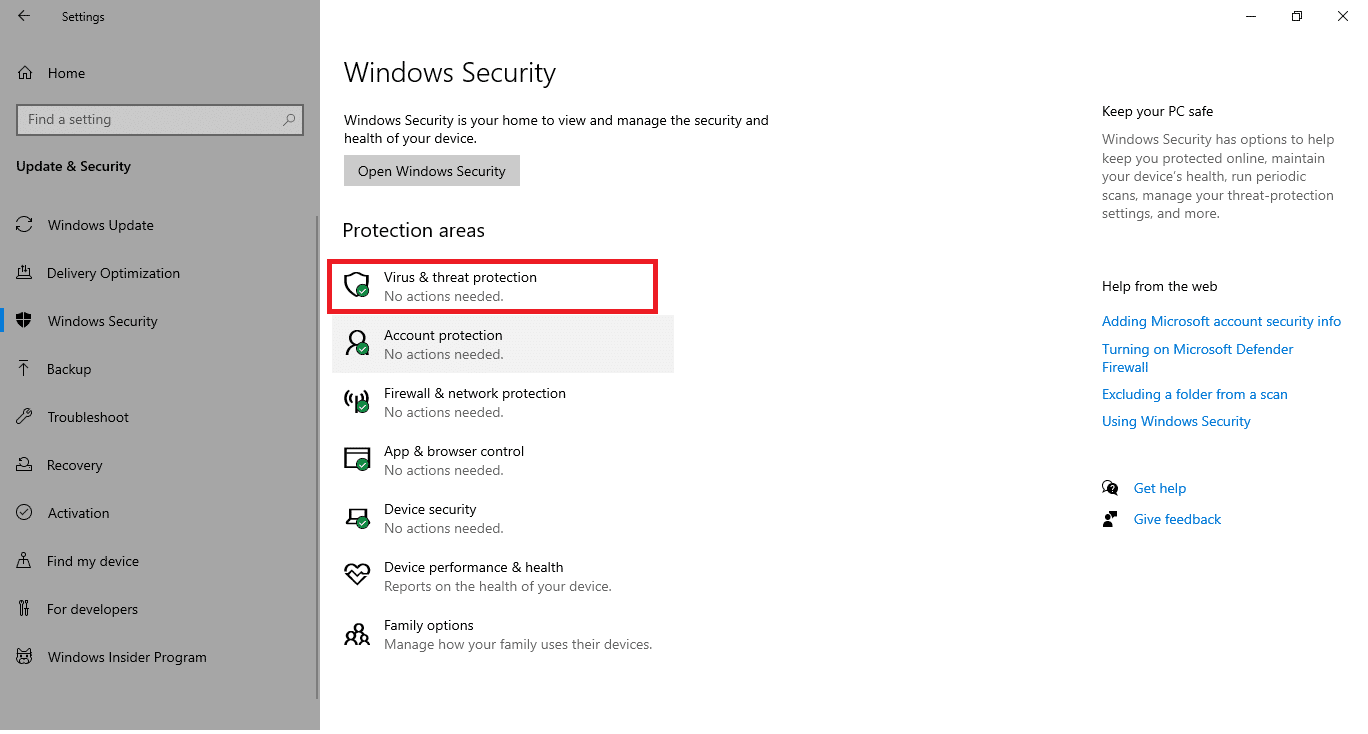
Click on the Virus & threat protection option in the right pane.
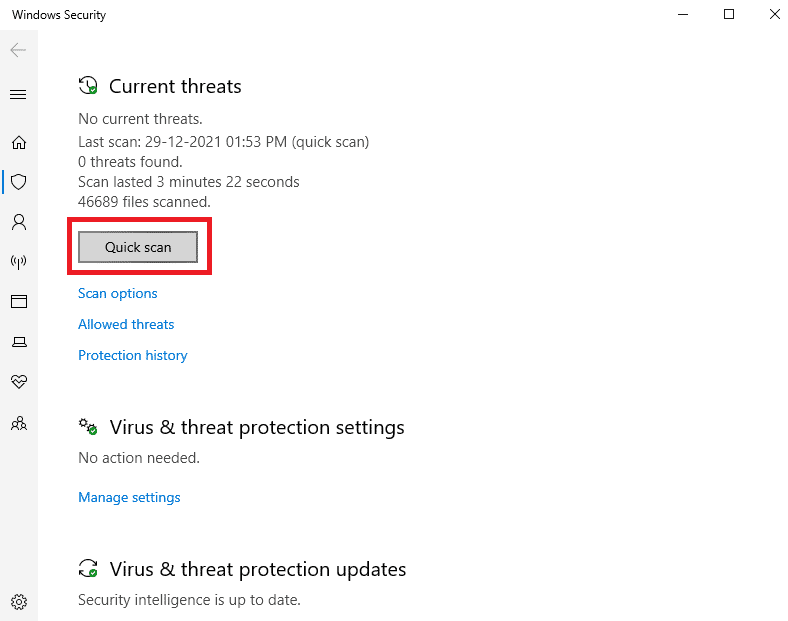
Click on the Quick Scan button to search for malware.
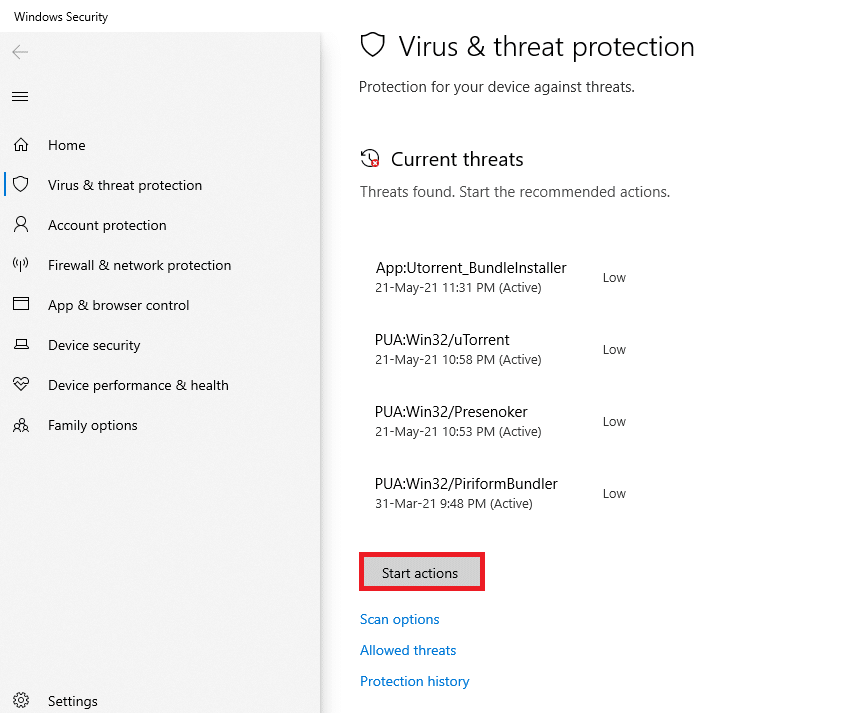
6A. Once the scan is done, all the threats will be displayed. Click on Start Actions under Current threats.
6B. If there is no threat in your device, the device will show the No current threats alert.
Method 11: Replace Keyboard
If none of the methods mentioned above work for you, it is probably due to a faulty keyboard. And to fix that you have to replace the keyboard with a newer one. Before buying a new keyboard, try connecting another keyboard and check whether the Windows key works. If it works, then buy a new keyboard to resolve the Windows key not opening the Start menu issue. Also Read: How to Disable Mouse Acceleration in Windows 10 Q1. Is there any third-party tool available to enable the Windows key? Ans. AutoHotkey, Winkill, and WKey Disabler are some of the third-party tools to enable or disable the Windows key. Q2. How do I disable the Windows key? Ans. You can easily disable the Windows key by modifying the registry settings. Change the Value data to 1 in the NoWinkeys string to disable the Windows key. Q3. What are some of the shortcuts that can be used with the Windows key? Ans. Below are some of the shortcuts that involve the Windows key.
Windows + Tab: Open task view Windows + D: Hide or Show Desktop Windows + X: Open the Quick link menu Windows + Spacebar: Toggle between the keyboard layout Windows + L: Lock the screen Windows + I: Open settings Windows + Up arrow: Maximize current window Windows + Down arrow: Restore down current window Windows + V: Clipboard
Recommended:
Fix Process System Not Responding on Android Fix Discord Keeps Crashing 15 Best Free Email Providers for Small Business Fix Twitch Not Working on Chrome
We hope this article will help you on how to resolve Windows key disabled problem. Let us know your queries and suggestions in the comment section below.


